New to Sly Flourish? Start Here or subscribe to the newsletter.
Hoard of the Dragon Queen Episode 3: Dragon Hatchery
by Mike on 27 October 2014
In case you missed it, we're writing tips and tricks for each of the chapters of Hoard of the Dragon Queen, the first official D&D 5th Edition adventure.
You can read all of our Hoard of the Dragon Queen articles here:
- Episode 1: Greenest in Flames
- Episode 2: The Raider's Camp
- Episode 3: The Dragon Hatchery
- Episode 4: On the Road Part 1
- Episode 4: On the Road Part 2
- Episode 5: The Carnath Roadhouse
- Episode 6: Castle Naerytar
- Episode 7: The Hunting Lodge
- Episode 8: Skyreach Castle
As before, expect this article to be packed with spoilers. Stop reading if you're planning to play through this adventure.
Now let's dig into this most current chapter.
A Solid Dungeon Crawl
The Dragon Hatchery is mostly a straight forward dungeon crawl, which is a change from previous chapters. You don't have to worry too much about a bunch of detailed conversations or delicate politics and deception. Getting your PCs into the dungeon and letting them run free inside it is the hardest part of this chapter. Once inside, experienced players will know what to do.
The Main Points
Like previous chapters, it's useful to outline the important parts of the adventure, the parts that should happen. In Chapter 3, there are only a few main points you should get across to the PCs so the rest of the adventure runs smooth. Let's take a look:
- Erlanthar, the monk rescued in chapter 2, should give the PCs insight into the motivations of the Cult of the Dragon.
- The PCs should go to the camp and find the cave.
- The PCs should learn that the cave and its residents are still there to protect the dragon eggs.
- The PCs should learn that the money stolen from Greenest and neighboring cities is gone.
- The PCs should return to Greenest for the next part of the adventure to begin.
A Big Plan for Nothing
In the beginning of this adventure, Erlanthar the monk sends the PCs back to the camp to learn more about the cultists and where they are going. Unfortunately for everyone (including us DMs), the PCs and NPCs aren't aware that the cultists are packing up and leaving. This means that good players will spend a long time figuring out how to infiltrate the camp, buying supplies and disguises and other odds and ends to infiltrate the camp, only to find out that everyone is gone and all that planning doesn't matter.
There isn't a great way around this. You might have a cultist spy captured early before the PCs start any big plans or a nearby traveler might describe seeing all of the caravans leaving the canyon in different directions.
Most importantly, try your best to not waste the time of your players. Instead, hint that they may want to investigate the camp before coming up with big plans to defeat it. Otherwise you might spend an hour or more on a plan that will never come to pass.
The Dynamic Dungeon
Like all good dungeons, the Dragon Hatchery is a living dungeon. People move around, things happen, weird shit will get investigated by patrols. Cyanwrath and his guards might move around as might Mondath. Let the dungeon react to the actions of the PCs. Play it out like a living place as much as you can.
Give Them A Chance to Rest
As active as the hatchery is, though, you'll want to help the PCs find a plcae to take at least one short rest. The hatchery can be rough if the PCs choose to carve through this whole dungeon without taking a short rest, particularly when the PCs face Cyanwrath. Give them a chance to take a short rest without being interrupted by guards. Room 6, the meat locker, is probably the best place, but tricky PCs might come up with other options as well.
If the PCs enter into the battle with Cyanwrath without having taken a solid short rest in a while, you can use the following:
"Seeing your nemesis Cyanwrath standing in front of you fills you with a great surge of energy! You may all take the equivalent of a short rest."
Cyanwrath
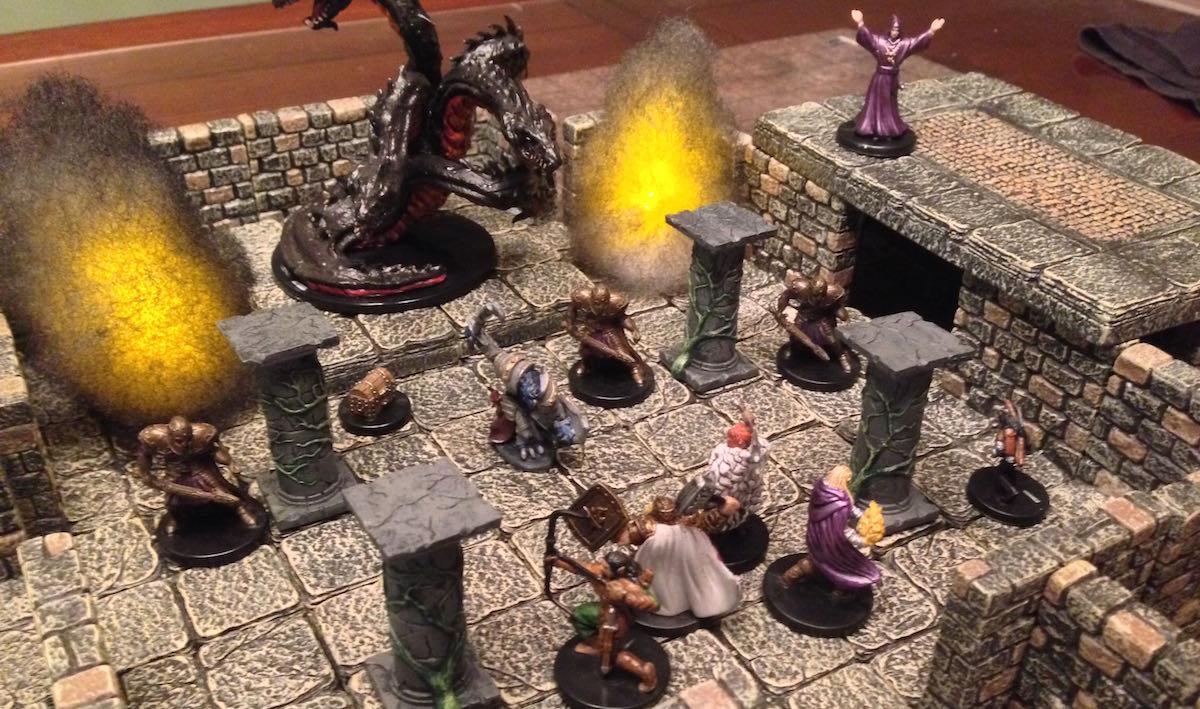
The battle with Cyanwrath is likely the big set-piece battle in this adventure. If you enjoy a nice tactical battle, this is the place to do it. Use a dragon or hydra miniature to represent the Tiamat statue. Throw in a mage up on an upper platform if you want to spice things up a bit. Maybe even give Cyanwrath or his mage ally a magic item. There are few magic items in the early parts of Hoard of the Dragon Queen so maybe hand one out.
You'll want to heed the advice in the book of adding more berserkers for parties of more than four PCs, otherwise this fight might be too easy. The berserker's reckless feature makes it useful for pacing out the fight. If things are going slow, speed them up by having the berserkers use reckless, thus hammering out more damage but taking more at the same time.
The big acid trap in the room is another nice variable to this fight. It's possible, if he feels like the PCs are being really dishonorable, that Cyanwrath will trigger the trap and run out of the room. It's also possible the PCs might set it off to get the upper hand on their opponents if they can figure it out before the battle starts. All of the kobolds in the dungeon are likely aware of the trap since they're fans of such devious constructs.
Handling Total Party Wipes
If for some reason your group finds themselves defeated by Cyanwrath or another encounter, there are some good options in this dungeon for handling it. Instead of killing the PCs, Cyanwrath or Mondath can throw the PCs into the wyrmling room to feed the hatching wyrmlings. The roper, ordered not to disturb the food of the wyrmlings, might engage them in healthy conversation and perhaps offer them a deal. He wants to eat the eggs but won't do so while Cyanwrath or Modath are still around. He'll let them rest and recover in the pit to take on the dragon cult leaders.
Escaping Villains and Future Threats
With Cyanwrath and Mondath as key villains in this adventure, it's possible one or both of them might escape. Cyanwrath isn't likely to run away but Mondath might be willing to fight another day. If she happened to get sprayed by the acid dragons in Cyanwrath's chambers, she might even come back as a mysterious masked villain later on when the timing is right. None of that is in the adventure but it can make for a fun side-quest in the version you run.
A Solid Conclusion
However it ends up, the end of the dragon hatchery is a great conclusion to the invasion of Greenest. Vengeance is sought and mysteries are tied up. Next time, the party begins the great journey north to follow the hoard and find out the true plans of the Cult of the Dragon.
Related Articles
- Hoard of the Dragon Queen: Raider's Camp
- Hoard of the Dragon Queen: Greenest in Flames
- Hoard of the Dragon Queen Episode 8: Skyreach
Share this article using this link: https://slyflourish.com/hodq_dragon_hatchery.html
Subscribe to Sly Flourish
Subscribe to the weekly Sly Flourish newsletter and receive a free adventure generator PDF!
More from Sly Flourish
Sly Flourish's Books
- City of Arches
- Return of the Lazy Dungeon Master
- Lazy DM's Companion
- Lazy DM's Workbook
- Forge of Foes
- Fantastic Lairs
- Ruins of the Grendleroot
- Fantastic Adventures
- Fantastic Locations
Have a question or want to contact me? Check out Sly Flourish's Frequently Asked Questions.
This work is released under a Creative Commons Attribution-NonCommercial 4.0 International license. It allows reusers to distribute, remix, adapt, and build upon the material in any medium or format, for noncommercial purposes only by including the following statement in the new work:
This work includes material taken from SlyFlourish.com by Michael E. Shea available under a Creative Commons Attribution-NonCommercial 4.0 International license.
This site may use affiliate links to Amazon and DriveThruRPG. Thanks for your support!
